Stage 44.2PageExperience
Outreach with Partners
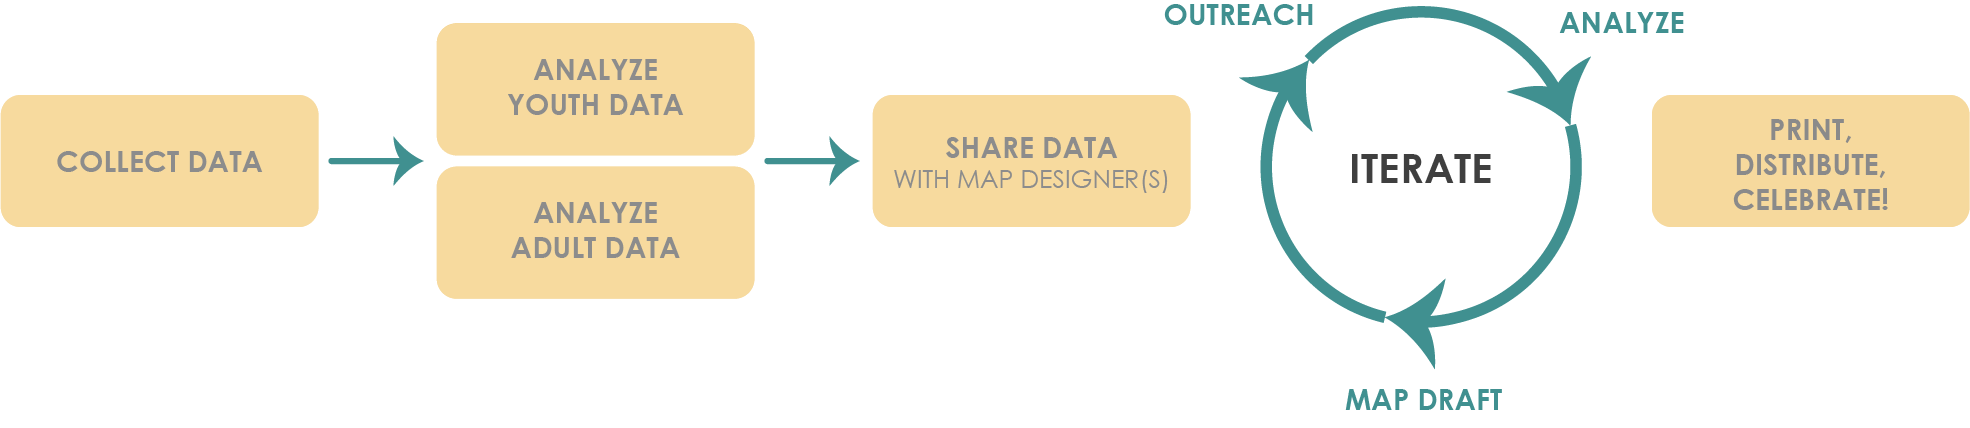
One of the most important ways that you will receive feedback on your first map draft is through outreach with your partners. Below, we have outlined the suggested steps for outreach, analyzing, and drafting when working with your partners.
Step 1 - Schedule Outreach with Partners
Schedule feedback sessions with your original partners. If you are able, we recommend having your team visit these classrooms to conduct the feedback sessions. If it is not possible, you can engage your partners to lead the sessions as they did with Lesson 1.
Step 2 - Conduct Outreach with Partners
Now that you’ve scheduled with partners and prepared for the feedback sessions, its time to facilitate the Partner Feedback Session with the specific purpose of gathering young people’s input on draft map 1. Exciting!
We have provided a lesson plan of what a Partner Feedback Session might entail. This can be led by yourselves, your partners, or a combination! View the Lesson Plan for a Partner Feedback Session Here.
Here is the general shape of the Partner Feedback Session:
- Review the map project briefly, share the map draft, explain what you’ve heard so far from young people and parents of children 0-5. Share how what you have heard is reflected in the first draft in front of them.
- Repeat Activity 1 from Lesson 1 (using map draft 1 as the map example) to understand what elements of the map youth like, don’t like and need improvement and what is missing. What would they like to see in the 2nd draft?
- Instead of using the notecatcher to “catch” youth feedback about map draft 1, we created this feedback form. You will want to create your own feedback form from this template. Depending on the size and age of the class, you can fill out the feedback form as a whole group or split the class into two or more groups to give students more individualized attention.
- Try to key into young children’s perspective of how they see the world in literal terms, sometimes. Second graders that we worked with thought that the beige colored background on our first map draft represented “sand” because that color literally looked like sand. They told us, “Wow, I didn’t know Boulder had some much sand!” Those students recommended that we change the color on the next draft to avoid confusion for other children.
- You might consider having a clipboard available for folks to sign up for your newsletter or to stay involved with the map project.
- Tell children and parents where to find the maps once they are published.
Step 3 - Analyze Feedback from Partner Feedback Sessions
- Reflection after each session is important. Take time to go over all of the information you gathered and share team perceptions of each session.
- When you enter the data into the feedback form you are able to create a spreadsheet automatically.
- Like you experienced in working with the initial map data, themes will emerge for things kids like, what they don’t like and what additions they recommend.
Step 4 - Map Draft
- Based on what children and youth say and your design goals for the map, make changes. We suggest creating a tracking document that your designer manages that holds each desired change and then noting when that change has been made.
Step 5 - Iterate
It is likely that you will be conducting feedback sessions with partners at different times. It is ok for you to share Draft 1 with the first group, Draft 2 with the second, etc. etc. The main goal of conducting feedback sessions is to ensure that the map is friendly to children and youth and helping them to have a more connected relationship with their community. When you conduct outreach sessions you are asking the youth: Did we get it right?